Exporting a list of computers from Active Directory (AD) is one of those tasks that every IT professional encounters sooner or later. Whether you’re cleaning up stale computer accounts, planning a migration, auditing your environment, or simply documenting your network assets, having a reliable way to extract this information is essential.
The good news is that there are multiple ways to get the job done—some code-based, some GUI-based, and some enterprise-level. And the method you choose depends entirely on your comfort level, your tools, and the requirements of your organization.
Method 1: PowerShell Script to Export Computer List from AD
PowerShell is the modern backbone of Windows administration. It’s powerful, fast, and designed specifically to interact with Active Directory using built-in modules.
If you’re comfortable typing a few commands, PowerShell is hands-down the most efficient and flexible way to export computer objects.
1.1 Why PowerShell Is the Best Method
PowerShell is preferred because:
- It’s built into Windows Server environments.
- It supports filtering, sorting, and custom attributes easily.
- It produces exportable formats like CSV, which work well with Excel, Power BI, or asset-tracking systems.
- It works remotely and in automated scheduled tasks.
Using PowerShell means you can repeat the same operation consistently with no manual clicking.
1.2 Prerequisites
Before running any commands, ensure that:
- You have the Active Directory module installed.
- You’re running PowerShell as an administrator.
- You have permissions to read Active Directory objects.
If you’re on a domain controller or an admin workstation with RSAT installed, you’re good to go.
To verify the AD module is installed, run:
Get-Module ActiveDirectory -ListAvailableIf you see it listed, you’re ready.
1.3 Basic PowerShell Command to Export All Computers
Here is the simplest, cleanest command to export a list of computers:
Get-ADComputer -Filter * | Select-Object Name | Export-Csv "C:\ADComputers.csv" -NoTypeInformationThis command:
- Queries all computers (
-Filter *) - Extracts only the Name attribute
- Saves the results to a CSV file
The CSV can be opened normally in Excel.
1.4 Exporting More Detailed Computer Information
Most administrators want more than just a computer name. Common details include:
- Operating system
- Last logon date
- Description
- Distinguished Name (OU location)
- IPv4 address
- Enabled/Disabled status
Here’s a richer export:
Get-ADComputer -Filter * -Properties * |
Select-Object Name, OperatingSystem, OperatingSystemVersion, LastLogonDate, Enabled, IPv4Address, DistinguishedName |
Export-Csv "C:\ADComputers_Detailed.csv" -NoTypeInformation
This gives you a truly useful asset list that answers most audit questions.
1.5 Export Only Computers in a Specific OU
Sometimes you don’t need the entire domain—just devices in a certain department or site.
Get-ADComputer -Filter * -SearchBase "OU=Workstations,OU=Office1,DC=MyDomain,DC=com" -Properties * |
Select-Object Name, OperatingSystem, LastLogonDate, IPv4Address |
Export-Csv "C:\Computers_Office1.csv" -NoTypeInformation
Replace the OU path with your actual environment.
1.6 Export Only Active or Only Disabled Computers
To export only enabled computers:
Get-ADComputer -Filter "Enabled -eq 'True'" | Export-Csv "C:\EnabledComputers.csv" -NoTypeInformationTo export disabled computers:
Get-ADComputer -Filter "Enabled -eq 'False'" | Export-Csv "C:\DisabledComputers.csv" -NoTypeInformationThis is helpful for cleanup projects.
1.7 Export Only Computers That Haven’t Logged In Recently
This helps you identify stale accounts.
Example: No login for 90+ days.
$Cutoff = (Get-Date).AddDays(-90)
Get-ADComputer -Filter * -Properties LastLogonDate |
Where-Object {$_.LastLogonDate -lt $Cutoff -or !$_.LastLogonDate} |
Export-Csv "C:\StaleComputers.csv" -NoTypeInformation
This is a very common task before decommissioning old devices.
1.8 Export Results to the Screen Instead of CSV
Sometimes you just want to see the results:
Get-ADComputer -Filter * | Format-Table Name, Enabled, IPv4AddressThis prints it to the console neatly.
Method 2: Alternative Code-Based Methods Using Command Line (dsquery)
Before PowerShell became the standard, Microsoft provided command-line tools like dsquery, dsget, and dsmod.
While older, dsquery still works in modern Windows Server versions and can be an alternative for quick queries.
2.1 What is dsquery?
Dsquery is a command-line utility that comes with:
- Domain controllers
- RSAT tools
- Windows Server OS
It uses LDAP queries underneath and can fetch computer objects efficiently.
2.2 Basic dsquery Command to Export Computers
To list all computers:
dsquery computer -limit 0This displays distinguished names in the command window.
2.3 Exporting to a Text File
Add a redirection operator:
dsquery computer -limit 0 > C:\ADComputers.txtThis saves all computer distinguished names (DNs) to a text file.
2.4 Using dsquery to Find Computers in a Specific OU
dsquery computer "OU=Workstations,OU=HeadOffice,DC=MyDomain,DC=com" -limit 0 > C:\OfficeComputers.txtThis is useful for one-off filtering.
2.5 Using dsquery with dsget for Attributes
While dsquery outputs only the DN, you can pipe to dsget for more details:
dsquery computer -limit 0 | dsget computer -dn -desc -samid > C:\Computers_Details.txtIt’s not as flexible as PowerShell, but it works.
2.6 Why dsquery Is Mostly Legacy Today
While dsquery is functional, PowerShell replaced it because:
- PowerShell is object-based
- Filtering is easier
- Export formats are better
- Scripting is more readable
- New AD features integrate directly
Students should still learn dsquery because many older IT documents and scripts still use it, but PowerShell remains the future.
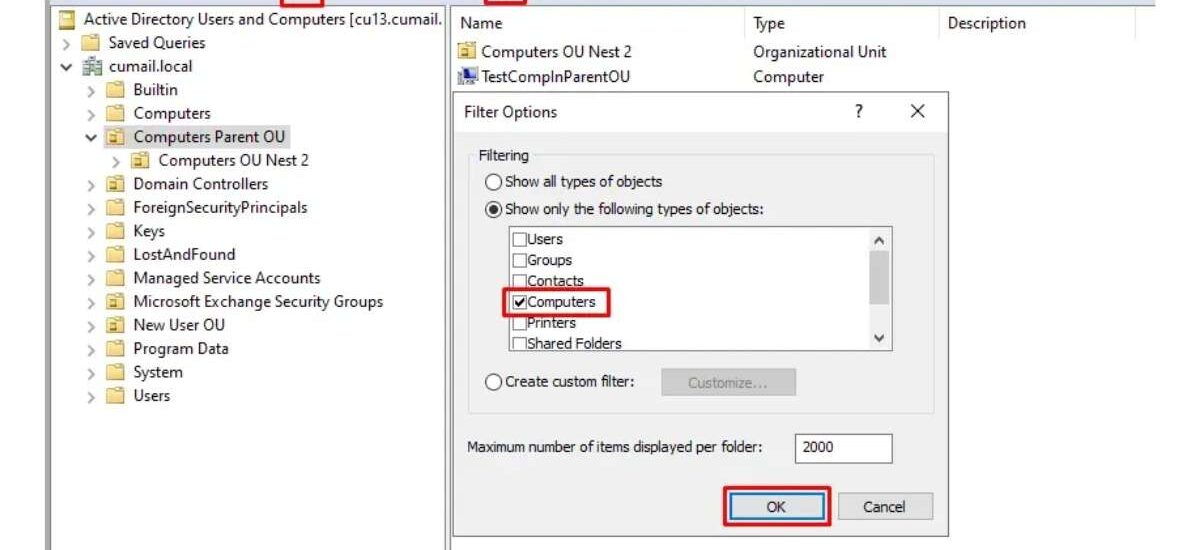
Method 3: Non-Code Method Using Active Directory Users and Computers (ADUC)
If you’re not comfortable with scripts or commands, no worries—Active Directory Users and Computers (ADUC) offers a built-in graphical way to export computer lists.
This is ideal for beginners and visual learners.
3.1 What is ADUC?
ADUC is the classic management console for Active Directory. It provides a tree view of OUs, containers, users, groups, and computers.
Most IT admins use ADUC daily for password resets, account lookups, and OU management.
3.2 How to Export Computer List from ADUC (Step by Step)
Step 1: Open ADUC
You can launch it by:
- Opening Run
- Typing:
dsa.msc - Pressing Enter
Or via Administrative Tools.
Step 2: Navigate to the OU Containing the Computers
You can also choose the entire domain, but exporting by OU is cleaner and more organized.
Step 3: Click “View” and Enable Advanced Features
This reveals more attributes and gives cleaner exports.
Step 4: Select All Computer Objects
You can press Ctrl + A inside the object pane.
Step 5: Right-click → Export List
You can export as:
- TXT
- CSV
- HTML
CSV is the standard option for spreadsheets.
3.3 Limitations of ADUC Export
While easy, ADUC’s export has limitations:
- It exports only visible columns, not full attributes
- You must manually rearrange column layout
- No advanced filtering
- No scheduled automation
Even so, ADUC is perfect for quick, small-scale exports.
Method 4: Using Active Directory Administrative Center (ADAC)
Active Directory Administrative Center (ADAC) is the modern GUI for managing Active Directory. It was introduced to give administrators a cleaner interface and deeper PowerShell integration.
If you’re using newer versions of Windows Server (2012–2025), you probably have ADAC available.
4.1 Why Use ADAC?
ADAC provides:
- A modern interface
- Built-in filtering panels
- PowerShell history viewer
- Better attribute display
- More flexible search options
- Support for fine-grained password policies
It is vastly more powerful than ADUC for bulk operations.
4.2 How to Open ADAC
You can open it by:
- Searching for Active Directory Administrative Center
- Or typing:
dsac.exe
It opens a central management dashboard.
4.3 Exporting Computer Objects in ADAC
Unlike ADUC, ADAC doesn’t have a single “Export List” button. But you can export computers by using its advanced filtering and then copying the result.
Step-by-Step Guide
Step 1: Navigate to Your Domain Node
On the left panel, select your domain name.
Step 2: Use the Global Search Bar
Type:
(computer)or simply search “computer” to list all computer objects.
Step 3: Apply Filters (Optional)
You can filter by:
- Name
- OS version
- Last logon time
- Disabled / enabled status
- OU path
Step 4: Select All Items and Copy Them
Press:
- Ctrl + A to select
- Ctrl + C to copy
This copies selected objects (with attributes) to your clipboard.
Step 5: Paste into Excel or a CSV file
You can now save this as:
- CSV
- Excel workbook
- Text file
4.4 Why ADAC Is Useful for Students
ADAC shows the PowerShell command behind every action.
This teaches you what’s happening under the hood, which is invaluable for learning.
If you click the “PowerShell History” tab, you’ll see the actual command that ADAC used to fetch the objects.
This makes ADAC not only a management tool but a teaching tool.
Method 5: Professional Way of Exporting Computer Lists Out of AD
For larger organizations, manual export methods aren’t enough. Enterprise environments need robust auditing, reporting, automation, error checking, and historical tracking.
This is where professional tools come in.
5.1 Why Businesses Use Professional Tools
Professional tools provide:
- Automated scheduled exports
- Instant reporting dashboards
- Compliance-ready formats
- Alerts for new or deleted computers
- Tracking of stale or inactive devices
- Integration with CMDB, ticketing, and inventory systems
- Cloud/Hybrid AD reporting
These features make them essential for organizations with hundreds or thousands of machines.
5.2 Common Features of Professional AD Export Solutions
Even though tools differ, they usually offer:
Advanced Filtering
Filter by:
- OU
- Last logon
- OS version
- IP range
- Organizational department
Automated Scheduling
Daily/weekly reports without human intervention.
Centralized Dashboards
Graphical charts and breakdowns of:
- OS distribution
- Machine age
- Login frequency
Export Formats
CSV
Excel
PDF
Database export
API output
Accuracy and Compliance
Ensures reports follow internal and external audit standards.
5.3 Why This Method Matters for Students
Students learning Active Directory administration should be aware that:
- Enterprise environments do not rely solely on manual PowerShell commands
- Reporting is often automated through enterprise tools
- Documentation and compliance matter as much as technical skills
- Understanding professional tools prepares them for real-world IT careers
This makes Method 5 the most career-beneficial route, even if you don’t use these tools personally yet.
Conclusion
Exporting a computer list from Active Directory is a fundamental skill for any IT administrator, technician, or student. Thankfully, there isn’t just one way to accomplish this—there are many, and each method fits a different level of comfort, need, or environment.
PowerShell (Method 1) is the most powerful and modern approach. It gives deep control, flexible filtering, and automation capabilities that professionals rely on every day.
Command-line tools like dsquery (Method 2) offer legacy-but-functional alternatives that still appear in documentation and older scripts.
GUI tools like ADUC (Method 3) provide simple, accessible ways for beginners to export lists without writing any code.
ADAC (Method 4) bridges the gap, offering a modern interface, advanced filtering, and transparent PowerShell integration—making it a great learning tool.
Professional solutions (Method 5) bring automation, reporting, and compliance for enterprise-level organizations, reflecting how real-world IT operations run today.
No matter your skill level, one of these methods will fit your needs perfectly.
By understanding all these techniques, you equip yourself with both practical skills and the deeper knowledge needed for maintaining, auditing, and managing Active Directory environments confidently.