If you’re a Mac user, you’ve probably heard about Recovery Mode—the special environment that can help you reinstall macOS, restore from a Time Machine backup, repair disks, and more. But for many people, the thought of entering Recovery Mode feels daunting. What does it actually do? Will it delete your files? And how exactly do you boot into it?
Don’t worry. In this blog post, I’m going to walk you through step-by-step instructions on how to boot into Recovery Mode on your Mac. We’ll also address common fears (like losing your data), clarify why and when to use this feature, and give you a few pro tips to avoid making any mistakes.
Let’s get into it!
What Is Recovery Mode on a Mac?
Think of Recovery Mode as your Mac’s built-in emergency room.
It’s a special partition on your startup disk that runs independently of your main operating system. When your macOS is acting up—maybe it’s freezing, stuck on boot, infected by malware, or suffering from file corruption—Recovery Mode gives you tools to troubleshoot and fix your Mac without needing to boot into the full operating system.
Here’s what you can do in Recovery Mode:
- Restore your Mac from a Time Machine backup
- Reinstall macOS (without deleting your personal files)
- Use Disk Utility to repair, erase, or partition disks
- Access Terminal for advanced commands
- Set up network diagnostics
- Use Safari to access Apple’s support website
Now let’s see how to enter Recovery Mode, step-by-step.
How to Boot Mac in Recovery Mode?
The process differs slightly depending on the type of Mac you’re using: Intel-based Macs vs. Apple Silicon Macs (M1, M2, M3 chips).
For Intel-Based Macs:
These are Macs built before late 2020.
Step-by-Step Instructions:
Step 1: Shut Down Your Mac
Make sure your Mac is completely shut down. If it’s already off, that’s perfect. If it’s on, click the Apple logo () on the top-left corner and choose Shut Down.
Wait for the screen to go black and all lights to turn off.
Step 2: Power It On & Use the Command + R Keys
Press the Power button and immediately hold down the Command (⌘) + R keys.
Tip: Keep holding the keys until you see the Apple logo, a spinning globe, or the macOS Utilities window.
Once you see it, release the keys.
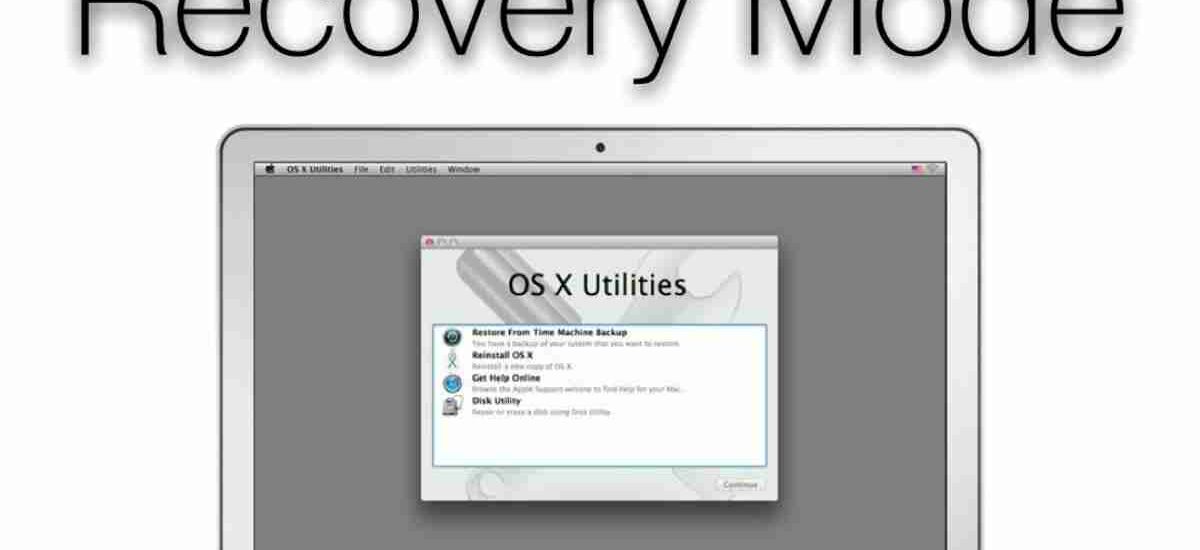
Step 3: You’re In!
Now you should see a window titled macOS Utilities with a list of tools:
- Restore from Time Machine Backup
- Reinstall macOS
- Safari
- Disk Utility
You’ve successfully booted into Recovery Mode.
For Apple Silicon Macs (M1, M2, M3 Chips):
These are Macs launched after late 2020, like MacBook Air M1, MacBook Pro M2, iMac M3, etc.
Step-by-Step Instructions:
Step 1: Shut Down Your Mac
Again, shut down your Mac completely. Hold the power button until the screen turns black and the device powers off.
Step 2: Press and Hold the Power Button
Instead of using a keyboard shortcut, press and hold the Power button (also known as the Touch ID button on MacBooks) for about 10 seconds.
You’ll see “Loading startup options…”
Step 3: Choose Options > Continue
You’ll now see your startup disk and an Options icon.
Click Options > then Continue.
That’s it—you’ve entered the Recovery Mode on an M-series Mac!
Pro Tip: Know the Variants of Recovery Mode
Besides the standard Recovery Mode, your Mac also has other startup options you can use depending on your situation:
| Shortcut | What It Does |
|---|---|
| Command + R | Reinstalls the latest macOS version that was on your Mac |
| Option + Command + R | Upgrades to the latest compatible version of macOS over the internet |
| Shift + Option + Command + R | Reinstalls the macOS that originally came with your Mac (or closest version still available) |
| Command + S | Single-user mode (for advanced Terminal use) |
| Option key | Lets you choose a startup disk |
Understanding these can help you troubleshoot more efficiently.
What Happens Inside Recovery Mode?
Here’s what each tool in the macOS Utilities menu does:
1. Disk Utility
Used for:
- Repairing your disk (using First Aid)
- Formatting or erasing drives
- Creating partitions
💡 Don’t erase anything unless you know what you’re doing. “Erase” means everything is gone.
2. Restore From Time Machine
This option allows you to restore a full backup of your Mac as it existed when you made the backup.
It’s ideal if:
- You accidentally deleted system files
- Your macOS is broken beyond repair
- You upgraded and want to roll back
3. Reinstall macOS
This reinstalls the macOS system files.
Worried about losing your files?
Don’t be! If you just reinstall macOS without erasing the disk, your apps and personal files remain intact.
4. Terminal
For power users who want to run Unix commands or scripts directly.
Great for:
- Resetting passwords
- Killing stubborn processes
- Mounting/unmounting volumes manually
5. Safari
If you need to access Apple’s support or look up recovery steps online, Safari is available—even in Recovery Mode.
Will Recovery Mode Remove Every File from macOS?
Let’s address the elephant in the room.
Short Answer: NO.
Recovery Mode itself does not delete or remove any of your files—unless you specifically choose options that do.
Here’s a breakdown:
| Action | Will It Delete My Files? |
|---|---|
| Booting into Recovery Mode | ❌ No |
| Reinstalling macOS (without disk erase) | ❌ No |
| Using Disk Utility > First Aid | ❌ No |
| Using Disk Utility > Erase | ✅ Yes, deletes everything |
| Restore from Time Machine | ✅ Yes, replaces everything with the backup |
| Terminal commands (depends on usage) | ⚠️ Possibly, if used incorrectly |
✅ If you don’t erase the disk, you won’t lose your personal files.
Mistakes to Avoid in Recovery Mode
- Accidentally erasing your startup disk – Make sure you don’t click “Erase” unless you’re ready to wipe your Mac.
- Installing the wrong macOS version – Using the wrong keyboard shortcut may install an older/newer version of macOS than you want.
- Not having a backup – Always back up your data before performing significant changes.
- Thinking Terminal is harmless – Commands in Terminal can be powerful and destructive if misused. Don’t try random commands you find on forums.
When Should You Use Recovery Mode?
Here are the top scenarios where Recovery Mode can save your day:
- macOS won’t boot up normally
- You suspect your disk is corrupted
- You want to reinstall macOS but keep your files
- You want to format the disk before selling your Mac
- You’re locked out of your Mac and want to reset it
BONUS: What If Recovery Mode Doesn’t Work?
Sometimes, Recovery Mode might not launch. Here’s what you can do:
1. Try Internet Recovery
Hold Option + Command + R during startup. This downloads Recovery Mode from Apple’s servers.
2. Use a Bootable USB Installer
You can create a bootable macOS installer using a USB drive and the createinstallmedia Terminal command.
3. Use Apple Configurator (For Apple Silicon Macs)
If nothing works, Apple Configurator on another Mac can help revive or restore your Mac.
4. Visit Apple Support
If all else fails, head to an Apple Store or authorized service center.
Final Thoughts
Recovery Mode is one of the most powerful features macOS has to offer. It gives you a safety net when things go wrong, from failed updates to startup errors and everything in between.
And the best part? It’s non-destructive—as long as you don’t erase anything intentionally, your files and data are safe.
So next time your Mac gives you trouble, don’t panic. Just remember:
- Shut down your Mac
- Boot into Recovery Mode using the right method
- Choose the appropriate tool
- Avoid the “Erase” option unless you’re sure