Have you ever lost your favorite photos due to accidental deletion, formatting, or corruption of a drive? We’ve all been there. It’s frustrating, especially when those images are irreplaceable memories from birthdays, weddings, or travel adventures.
While most people rush to download third-party recovery tools, what many don’t realize is that Windows’ built-in Command Prompt (CMD) offers a surprisingly effective way to recover deleted or hidden photos — and it doesn’t cost a thing!
In this blog, we’ll walk you through every method available to recover photos using CMD, using real-world language and examples so you don’t need to be tech-savvy to follow along.
Why Use CMD for Photo Recovery?
CMD (Command Prompt) is a powerful utility in Windows that allows you to interact directly with the system. It can:
- Scan drives for errors.
- Unhide hidden files.
- Repair corrupt file systems.
- Retrieve lost files from USB drives, hard drives, SD cards, and more.
While it’s not a magic wand, it’s a highly underrated recovery method — especially when used immediately after file loss.
What You’ll Need Before You Start
Before jumping into CMD photo recovery, ensure you have the following:
- A Windows computer with CMD access.
- The drive (internal, external, USB, or SD card) connected to your PC.
- A backup destination to save recovered files (e.g., a different drive or folder).
Method 1: Recover Hidden or Lost Photos Using ATTRIB Command
This method is best when files are still present on the drive but are hidden or marked as system files due to corruption or malware.
Steps:
- Connect your storage device (e.g., SD card, USB, or external HDD) to the PC.
- Open Command Prompt as Administrator:
- Click on the Start menu.
- Type
cmd→ Right-click → Run as administrator.
- Locate your drive letter:
- Go to
This PCand note the letter assigned to the device (e.g.,E:).
- Go to
- Run the ATTRIB command:
Type the following: bashCopyEditattrib -h -r -s /s /d E:\*.*ReplaceE:with your actual drive letter.
What This Does:
-h: Removes hidden attribute.-r: Removes read-only attribute.-s: Removes system file attribute./s: Applies to all files in subfolders./d: Applies to directories.
Outcome:
Your hidden or system-flagged photo files may now be visible again in the file explorer. This is especially helpful for SD cards and USBs affected by malware.
Method 2: Use CHKDSK to Fix Disk Errors and Recover Lost Data
Sometimes the photos aren’t deleted — they’re just inaccessible due to file system errors.
Steps:
- Open Command Prompt as Administrator.
- Type the command: bashCopyEdit
chkdsk E: /fReplaceE:with the appropriate drive letter. - Wait for the scan to complete. CMD will attempt to fix file system errors and might recover lost data fragments in the process.
Outcome:
Once completed, look in the root of the drive for a folder like FOUND.000 — it may contain recovered files (usually with .chk extensions). You can try renaming them to .jpg and see if they open.
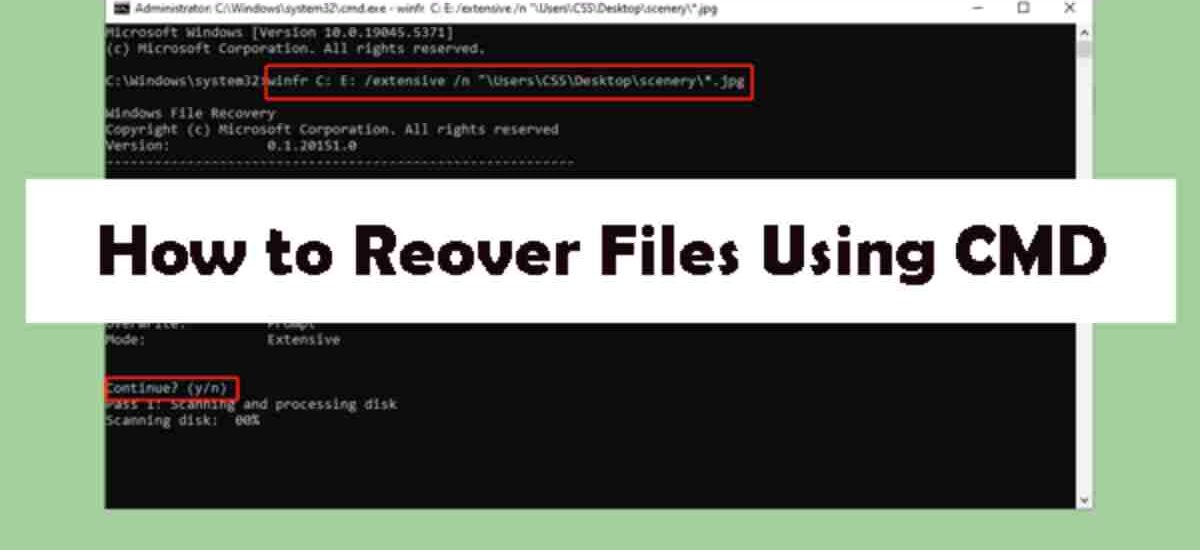
Method 3: Recover Deleted Photos Using Windows File Recovery Tool (via CMD)
When your photos are not just hidden but permanently deleted — and not in the Recycle Bin — this is your best shot using CMD.
Windows offers a command-line tool called Windows File Recovery, which can be downloaded from the Microsoft Store.
How to Use:
- Install the tool:
- Open Microsoft Store and search for Windows File Recovery.
- Click Install.
- Launch CMD as Administrator.
- Use the following syntax:
winfr source-drive: destination-folder /mode /n pathExample to recover JPEG photos fromD:toC:\Recovered:winfr D: C:\Recovered /extensive /n *.jpg
- Confirm with
Ywhen prompted.
Modes Explained:
/regular: Best for recently deleted files on NTFS./extensive: Best for corrupted/formatted drives or long-deleted files.
Outcome:
Photos will be recovered into the C:\Recovered folder. It may create subfolders like Recovery_[date], so be sure to look inside.
Bonus Tip: Previewing .CHK Files
If recovered files from FOUND.000 folder are in .chk format:
- Rename them to
.jpgmanually. - Try opening them with a photo viewer or editor.
Sometimes the recovered files are fragments, but with a little luck, your photo might still be intact.
Pro Tips for Higher Recovery Success
- Stop using the drive immediately once you realize files are missing — this avoids overwriting the data.
- Never install recovery tools on the same drive you’re recovering from.
- Try photo viewers that support corrupt or partial JPEGs, like IrfanView or GIMP.
- Use CMD early — over time, lost data sectors may be overwritten.
What CMD Can’t Do
While CMD is powerful, it has limitations:
- Can’t recover files from drives overwritten multiple times.
- Can’t recover files deleted a long time ago if the space has been reused.
- Doesn’t preview files before recovery.
If CMD doesn’t help, it’s worth exploring GUI-based tools like:
- Recuva
- PhotoRec
- EaseUS Data Recovery
Real-Life Scenarios
Use Case 1: Recovering Wedding Photos from a USB
A photographer accidentally deleted wedding photos from a USB. Using the attrib command, hidden photos were restored in minutes — no third-party tools needed.
Use Case 2: SD Card Corrupted After Phone Crash
After a crash, an Android SD card appeared empty. Running chkdsk + attrib on the drive revealed the photos were hidden, not lost.
Summary
| Method | Best For | Command |
|---|---|---|
attrib | Hidden photos on USB/SD | attrib -h -r -s /s /d E:\*.* |
chkdsk | File system errors | chkdsk E: /f |
winfr | Deleted files | winfr D: C:\Recovered /extensive /n *.jpg |
Final Thoughts
While Command Prompt might look intimidating at first, it’s actually a powerful ally in photo recovery — and completely free. Whether you’re a beginner or a tech-savvy user, CMD provides direct access to tools that can unearth your lost memories.
Still, prevention is better than cure. So, always back up your photos regularly — and bookmark this blog just in case.